To change a tax rate in QuickBooks Online, go to All apps > Sales Tax > Overview > Add/edit tax rates and agencies, find the rate, select Edit, update the percentage or name, and save. That covers the majority of manual rate changes. If the rate field is locked, the supported workaround is to create a new rate and make the old one inactive.
Before you touch anything, run through this short checklist:
- Open Sales Tax and note your current rates (screenshot or export).
- Check whether any recurring invoices or templates use the rate you are changing.
- Back up or export your current sales tax report for the active VAT period.
Pro Tip: Create a test invoice after saving any change and confirm the new rate appears correctly before sending anything to a client or filing a VAT return.
Rate changes apply to all future transactions from the moment you save. Past transactions keep their original rate. If a VAT return period straddles the change date, your reports will show both rates. Verify the figures with HMRC or your accountant before submitting.
Key takeaways
Changing a tax rate in QuickBooks Online safely requires editing or replacing the rate, updating every recurring template, and exporting reports before and after the change to protect your VAT audit trail.
| Point | Details |
|---|---|
| Edit or replace the rate | Use Add/edit tax rates and agencies for manual rates; create a new rate if the field is locked. |
| Update recurring templates | Edit every recurring transaction template before deactivating the old rate. |
| Export reports first | Save a sales tax liability report for the current VAT period before making any change. |
| Check automated tax separately | Custom rates within automated sales tax are editable in Sales Tax Settings; system-generated rates are not. |
| Consult HMRC if needed | If the change touches a submitted VAT return, contact HMRC or an accountant before assuming the figures are correct. |
Table of Contents
- What permissions and plan limits do you need first?
- Where to find the Sales Tax centre in QuickBooks Online
- How to edit an existing manual tax rate in QuickBooks Online
- How to update tax settings when you use automated sales tax
- How to add a new single or combined tax rate
- How to rename or deactivate a tax agency or rate
- How to handle recurring transactions and troubleshoot common errors
- How rate changes affect past transactions, reports and your VAT returns
- UK VAT and HMRC: when to get professional help
- A practical editor's view on safe, repeatable tax-rate workflows
- Sources
What permissions and plan limits do you need first?
Not every QuickBooks Online user can edit tax settings. Checking your access before you start saves a frustrating dead end.
| Requirement | What to check |
|---|---|
| User role | Only the Primary Admin or a user with Company Admin rights can edit sales tax rates and agencies. Standard users see the Sales Tax centre but cannot save changes. |
| QuickBooks Online plan | All UK plans (Simple Start, Essentials, Plus, Advanced) include manual sales tax. Automated sales tax availability depends on your account configuration. |
| Automated vs manual tax | If automated sales tax is enabled, some rate fields are managed by QuickBooks and cannot be edited directly; custom rates remain editable in Sales Tax Settings. |
| Active recurring transactions | List every recurring template that references the rate you plan to change before you start. |
| Data backup | Export the current sales tax liability report and save it externally. The Akika Labs blog covers QuickBooks Online backup options worth reviewing before making structural changes. |
If you are not the Primary Admin, ask whoever holds that role to make the change or to elevate your permissions temporarily.
Where to find the Sales Tax centre in QuickBooks Online
The path is slightly different depending on your account layout, but the destination is the same.
From the left-hand navigation, select All apps, then choose Sales Tax. This opens the Sales Tax Overview screen. If your account uses the older menu layout, look for Taxes in the left sidebar and select Sales Tax from there.
What you see next depends on whether automated sales tax is switched on. With automated sales tax enabled, the Overview shows a breakdown by tax agency and a Sales Tax Settings button in the top right. With manual rates, you see an Add/edit tax rates and agencies link instead. Both paths lead to the same underlying rate management screen, but the automated version wraps it in an extra layer of agency-level controls.
If the Sales Tax option does not appear in your menu at all, go to Settings (gear icon) > Account and settings > Sales tax and confirm that sales tax is turned on for your account.
How to edit an existing manual tax rate in QuickBooks Online
According to QuickBooks support, the steps to add or edit manual rates follow this sequence:
- Go to All apps > Sales Tax > Overview.
- Select Add/edit tax rates and agencies.
- Find the rate you want to update in the list.
- Select Edit on that row.
- Change the percentage, the name, or both.
- Select Save.
QuickBooks applies the updated rate to every new transaction you create from that point forward. Transactions already saved keep their original rate. There is no effective-date field in the standard UK QuickBooks Online interface, so the change takes effect immediately on save.
Some default rates are locked and the Edit option either does not appear or the percentage field is greyed out. In that case, the supported approach is to create a new rate at the correct percentage, update any recurring transactions to use the new rate, and then make the old rate inactive. Trying to force a change on a locked default rate is not supported and can cause reporting errors.
How to update tax settings when you use automated sales tax
When automated sales tax is active, QuickBooks generates tax agencies and rates based on transaction data automatically. You cannot edit those system-generated rates directly. What you can edit are any custom rates you have added on top of the automated framework.
QuickBooks confirms that custom rates remain editable under the custom rate section within Sales Tax Settings even when automated sales tax is on. To reach them, go to Sales Tax > Sales Tax Settings and scroll to the custom rates area.
The practical rule: if a rate was created by QuickBooks automatically, do not try to edit it. Create a new custom rate instead and apply it to the relevant transactions. If a rate was created by you manually, you can edit it directly from Sales Tax Settings. Automated sales tax reduces the volume of manual intervention needed, but it does not remove the need to manage custom or exception rates yourself. For a broader look at how cloud accounting platforms handle automation and tax settings, that guide covers the key interactions worth knowing.
How to add a new single or combined tax rate
Sometimes the cleanest solution is a new rate rather than editing an existing one. This is especially true when a VAT rate change takes effect mid-year and you need historical transactions to stay accurate.
- Go to All apps > Sales Tax > Overview > Add/edit tax rates and agencies.
- Select Add tax rate.
- Choose Single rate or Combined rate (a combined rate groups two or more components, such as a standard rate plus a levy).
- Enter the tax agency name, the rate name, and the percentage.
- For a combined rate, add each component separately and assign each to its agency.
- Select Save.
Naming matters more than most people realise. Include the agency, the percentage, and the scope in the name. If you ever need to distinguish between standard-rated and reduced-rated goods on the same account, clear names prevent the wrong rate being applied by mistake.
How to rename or deactivate a tax agency or rate
QuickBooks Online's Sales Tax settings let you rename agencies, change the accounting basis for the Sales Tax centre, and make rates inactive.
To rename an agency or deactivate a rate, go to Sales Tax > Sales Tax Settings, find the agency or rate, and select the relevant option. Making a rate inactive removes it from the dropdown on new transactions but preserves it on all historical records. That is exactly why deactivation is safer than editing in many cases: your past invoices still show the correct rate, and your VAT return history stays intact.
The one thing to check before deactivating: if a recurring invoice template still references the rate you are about to make inactive, QuickBooks will either apply no tax or throw an error on the next run. Update the template first, confirm the new rate appears on a test transaction, then deactivate the old rate.
How to handle recurring transactions and troubleshoot common errors
Recurring templates do not update automatically when you change a tax rate. You need to edit each template manually.
- Create the new rate (or confirm the edited rate is saved).
- Go to Settings > Recurring transactions.
- Open each template that used the old rate and update the tax field to the new rate.
- Save the template.
- Make the old rate inactive only after every template has been updated.
- Create a test invoice or sales receipt and verify the correct rate appears before sending it.
Common errors and fixes:
- Locked rate field: The rate is a QuickBooks default. Create a new rate and deactivate the old one rather than trying to edit it directly.
- Permission denied: You are not logged in as a Company Admin or Primary Admin. Switch accounts or ask the admin to make the change.
- Wrong rate on new invoices: The recurring template was not updated. Go back to Recurring transactions and check every template.
- Rate not appearing in dropdown: The rate may have been made inactive. Go to Sales Tax Settings, find the rate, and reactivate it.
How rate changes affect past transactions, reports and your VAT returns
A rate change in QuickBooks Online applies to new transactions only. QuickBooks is explicit on this: past transactions keep the rate that was in place when they were created, and reports will show data for both rates when transactions exist for each.
That split view is useful for auditing but can look confusing in a VAT return period that straddles the change date. The practical steps:
- Export your sales tax liability report for the current VAT period before making the change. Save it as a PDF or spreadsheet.
- Note the exact date and time you saved the new rate.
- After the change, run the same report again and compare the two versions.
- Attach both exports to your internal change notes.
If the rate change affects a VAT period you have already submitted to HMRC, do not assume the numbers are fine. Contact HMRC or your accountant to confirm whether an amendment is needed. A rate change that touches a closed period is an audit risk if it is not documented properly.
UK VAT and HMRC: when to get professional help
Most QuickBooks tax rate changes are straightforward bookkeeping tasks. A few situations call for more than a software update.
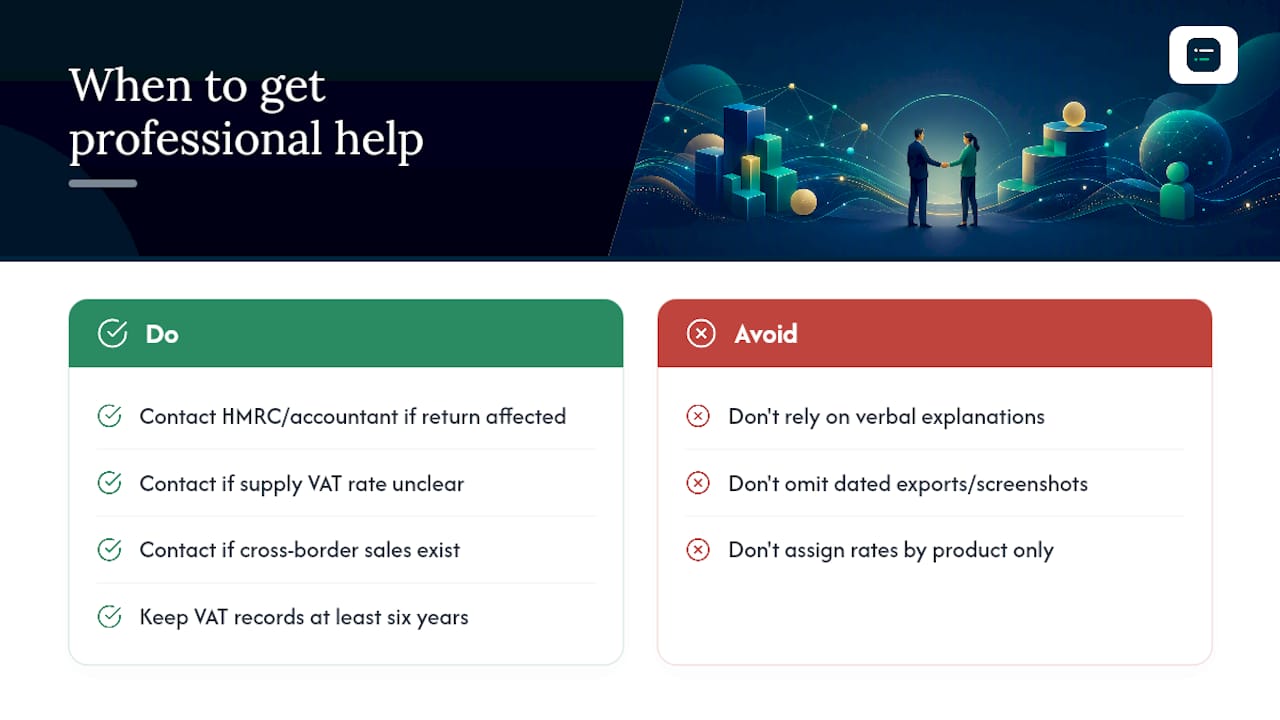
Contact HMRC or a qualified accountant if: the rate change affects a VAT return you have already submitted; you are unsure whether a supply should be standard-rated, reduced-rated, or zero-rated; you have cross-border sales where UK VAT rules interact with overseas obligations; or you are switching between cash and accrual VAT accounting at the same time as a rate change.
HMRC's recordkeeping expectations for VAT are clear: you must keep VAT records for at least six years. Exported QuickBooks reports, screenshots of the old and new rate settings, and a note of the change date and reason all count as supporting evidence. If HMRC ever queries a return, having a dated export showing what rate was in place on a given transaction date is far more useful than a verbal explanation.
Regional VAT behaviours within the UK are limited, but cross-border sales to EU customers post-Brexit carry their own rules. If your QuickBooks account handles both UK domestic and international sales, verify that the correct rate is assigned to each customer location, not just each product.
A practical editor's view on safe, repeatable tax-rate workflows
The step that most bookkeepers skip is writing down why the change was made. QuickBooks records what changed and when, but it does not record the business reason. A one-line internal note, "VAT rate updated from X% to Y% effective [date] following HMRC guidance," takes thirty seconds and saves hours if the account is ever reviewed.
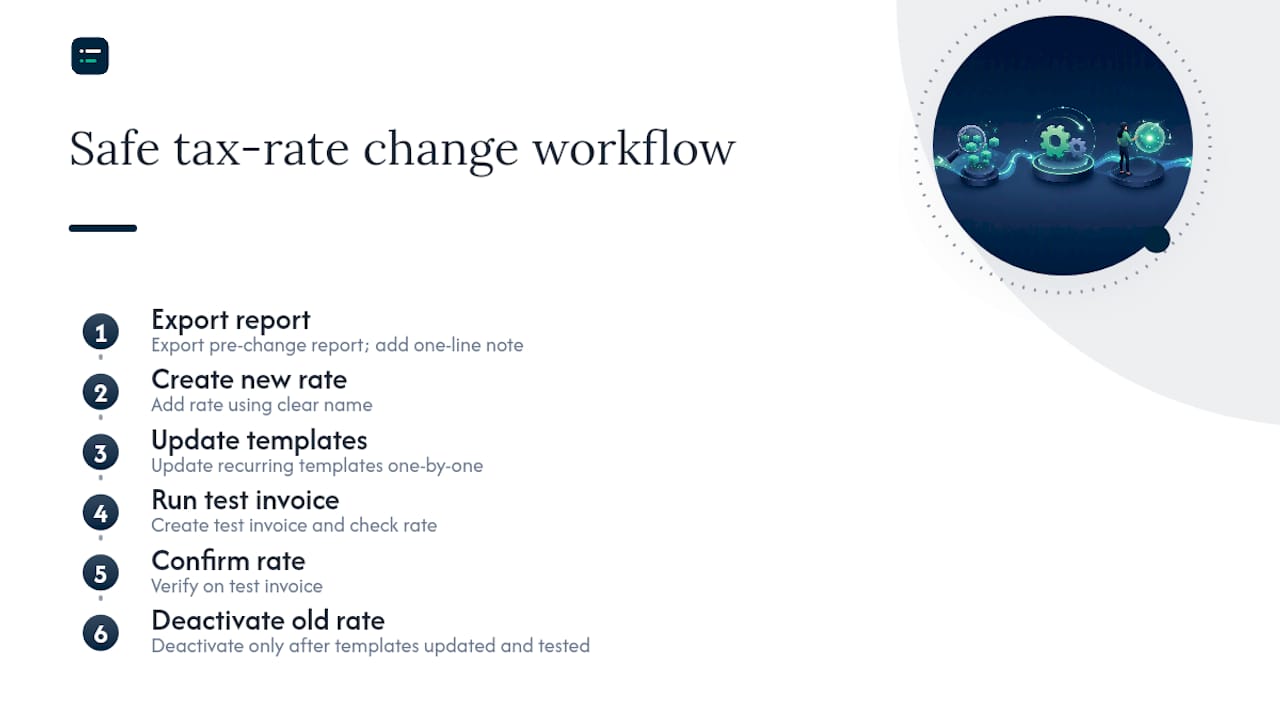
My recommended workflow for any rate change on a busy account: export the pre-change sales tax report first, create the new rate, update recurring templates one by one, run a test invoice, confirm the rate, then deactivate the old rate. Do not deactivate until every template is updated and the test invoice looks right. The sequence matters because a deactivated rate on an active template causes a silent error on the next scheduled run, not an immediate alert.
On naming: treat rate names like account codes. They should be self-explanatory to someone who has never seen your QuickBooks setup before. The extra words cost nothing and pay back every time you reconcile.
For practices managing multiple entities or VAT registrations, the same logic applies at scale: consistent naming conventions across entities make cross-entity reporting far less error-prone.
Sources
The following pages carry the official steps and screenshots for the tasks covered in this guide.
- Set up your sales tax in QuickBooks Online
- Changing Sales Tax Rates in QuickBooks: Online & Desktop - CLIMB
This article is general information, not a substitute for advice from a qualified financial advisor. Consult a qualified financial professional about your own circumstances before acting on anything here.